

Introduction to Christmas Lights Cookies
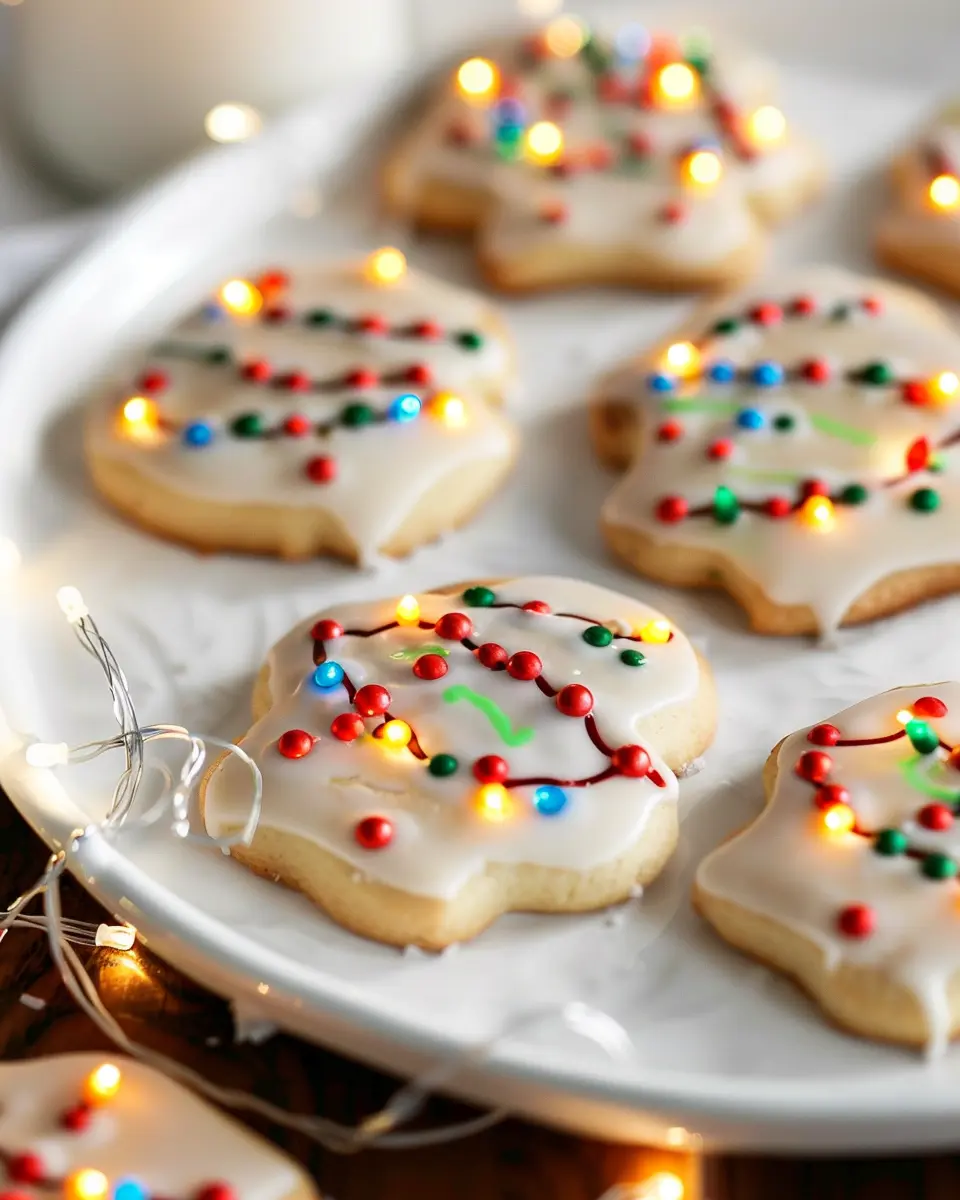
The holiday season is the perfect opportunity to indulge in festive baking, and there’s no better way to celebrate than with a batch of Christmas Lights Cookies. These delightful treats not only evoke the joy and merriment of the season but also add a splash of color to your holiday gatherings. With their vibrant icing and simple shapes, they’re sure to bring a smile to everyone’s face!
Why Christmas Lights Cookies are the Perfect Holiday Treat
When thinking about holiday treats, cookies often spring to mind first. So why should Christmas Lights Cookies be your top choice this year? Here are a few reasons:
-
Fun for Everyone: Decorating cookies is an activity that transcends age barriers. Whether it’s the kids or your friends, everyone loves getting in on the action. You can even host a cookie decorating contest to escalate the fun! It’s a great way to bond with loved ones.
-
Visually Appealing: A plate filled with colorful Christmas Lights Cookies can brighten any festive table. The striking design mimics twinkling holiday lights, inviting guests to indulge in both flavor and festivity.
-
Flexible Recipe: One of the best parts of making cookies is the flexibility it offers. You can modify recipes to meet dietary preferences or even use different types of icing for creative flair. Consider making them gluten-free with simple substitutions or using all-natural coloring for the icing.
-
Makes for Memorable Gifts: Handmade goodies always carry a special touch. Wrapped beautifully, these holiday cookies become amazing gifts for neighbors, coworkers, or friends—just remember to include the recipe card for a personal touch!
Don’t forget to check out resources like The American Baking Guild for expert tips and inspiration to master your cookie baking skills. If you’re looking for a solid icing recipe, many bakers recommend royal icing for its easy handling and vibrant colors.
As you embark on your cookie-making adventure this holiday season, remember that Christmas Lights Cookies are not just a treat; they’re a way to spread joy and create lasting memories with family and friends. So, let’s gather those ingredients and get ready to bake!
Ingredients for Christmas Lights Cookies
When it comes to baking festive treats, Christmas Lights Cookies take the cake! Here’s everything you need to whip up these colorful delights.
Essential ingredients for the cookies
To get started on your cookies, gather the following essentials:
- 2 ¾ cups all-purpose flour: This forms the base of your dough.
- 1 teaspoon baking powder: A must for that perfect rise.
- ½ teaspoon salt: Enhances the flavors beautifully.
- 1 cup unsalted butter, softened: Creamy texture and rich flavor are essential.
- 1 cup granulated sugar: Sweetness is key!
- ½ cup brown sugar: Adds that chewiness we love.
- 2 large eggs: For binding everything together.
- 2 teaspoons vanilla extract: A delightful aroma and taste.
Ingredients for the icing
Let’s create the festive touch with the icing:
- 2 cups powdered sugar: Sweet and smooth for easy application.
- 2 tablespoons milk: Helps achieve the right icing consistency.
- 1 teaspoon vanilla extract: Just like in the cookies, it adds great flavor.
- Food coloring: Bright, vibrant colors emulate those Christmas lights!
With these ingredients on hand, you’re set for a fun baking session! If you’re curious about how to perfect your cookie baking skills, check out this baking guide for some extra tips. Happy baking!
Preparing Christmas Lights Cookies
Getting into the festive spirit doesn’t only mean decorating the tree or wrapping presents; it also includes baking delicious treats like Christmas lights cookies. These cookies are not just tasty—they’re a beautiful addition to any holiday spread. Let’s dive into the step-by-step process of preparing these delightful cookies!
Prepping the kitchen and oven
Before baking begins, it’s essential to set the stage. Start by preheating your oven to 350°F (175°C). This allows the oven to reach the right temperature by the time you’re ready to bake.
Next, clear your kitchen counter and gather all necessary ingredients and tools:
- Mixing bowls
- Measuring cups and spoons
- A baking sheet lined with parchment paper
- A rolling pin
- Cookie cutters in the shape of light bulbs (or any holiday shapes you prefer)
Organizing your space will make the baking experience smooth and enjoyable.
Mixing the dry ingredients
In a medium bowl, mix together the dry ingredients, which usually include:
- 2 ½ cups all-purpose flour
- 1 teaspoon baking powder
- ½ teaspoon baking soda
- ½ teaspoon salt
Whisk these ingredients together until well combined. This simple but crucial step ensures that your Christmas lights cookies have a consistent texture and flavor.
Creaming the butter and sugar
In a large mixing bowl, cream together 1 cup of softened butter (preferably unsalted) and 1 cup of sugar until the mixture is light and fluffy. This can take about 3-5 minutes using an electric mixer. Not only does this step help to aerate the butter for a better cookie texture, but it also adds a satisfying sweetness, which is partly why baking is so enjoyable.
You can also add 1 large egg and 1 teaspoon of vanilla extract at this stage to enhance the flavor profile.
Combining wet and dry ingredients
Gradually add your dry mixture to the creamed butter and sugar, mixing until just combined. Be careful not to over-mix; a little flour should still be visible. This is a good time to channel your inner culinary artist—feel free to add in some colorful sprinkles or festive citrus zest to uplift the flavors even further.
Shaping and chilling the cookie dough
Once you have your dough, it’s time to shape it. Divide the dough into sections, roll each section into a ball, then flatten each ball slightly. Wrap the flattened dough in plastic wrap and chill it in the refrigerator for about 30 minutes. Chilling helps to solidify the fat in the dough, making it easier to roll out and cut later on.
Baking the cookies
After the dough has chilled, roll it out on a floured surface to about ¼ inch thick. Use your cookie cutters to create your cookie shapes and transfer them to the lined baking sheet, leaving some space between each one. Bake your Christmas lights cookies in the preheated oven for 8-10 minutes, or until the edges just begin to turn golden.
Preparing the icing
While your cookies are cooling, you can whip up some icing. Combine 2 cups of powdered sugar with 2 tablespoons of milk and 1 teaspoon of vanilla extract. If you’d like, consider adding food coloring for a more festive touch. Using a whisk, mix until the icing is smooth and has a drizzle-consistency.
Icing the cookies
Once cooled, it’s time to decorate! Use a piping bag or a simple zip-top bag with one corner snipped off to drizzle the icing over your cool Christmas lights cookies. Get creative! You can outline them, create bulb designs, or even use colored sprinkles for added flair.
By following these steps, you can create beautiful, holiday-themed cookies that will impress everyone at your gathering. Baking together can be a cherished tradition, so why not invite friends over and share the joy? Check out some tips on hosting cookie-decorating parties to elevate the fun!
So, get into your kitchen, and let those holiday vibes shine!

Variations on Christmas Lights Cookies
Alternative shapes and designs for festive fun
While the classic Christmas lights cookies are delightful, think about mixing it up with some alternative shapes to bring fresh energy to your holiday baking. You could try crafting star-shaped cookies, or even tree silhouettes that could be decorated to resemble beautiful holiday ornaments. If you’re feeling particularly adventurous, cookies shaped like snowflakes can also serve as a stunning backdrop for colorful designs.
Consider using different types of icing for your decorations — a glossy royal icing can give a polished look, while a thicker buttercream adds a cozy, homemade touch. Get imaginative with your color palette as well! Instead of standard green and red, hues like blue and gold or even pastel shades can make your creations uniquely yours. These variations not only make for a festive treat but can also be a fun baking project to tackle with friends or family.
Allergy-friendly adaptations
If you or your guests have food allergies, don’t fret! There are plenty of ways to adapt your Christmas lights cookies to be more inclusive. For a gluten-free option, you can easily swap all-purpose flour for a gluten-free blend — many grocery stores carry quality mixes that yield excellent results.
For those with dairy sensitivities, plant-based butters or coconut oil can replace traditional butter, allowing everyone to partake in the festivities. Additionally, if nut allergies are a concern, just ensure any food coloring or sprinkles used are certified nut-free.
Baking should bring everyone together, not create barriers! Celebrate the joy of the season with delicious, inclusive treats. You can find more helpful insights on holiday baking and allergy-friendly recipes through resources like The Food Allergy Research and Education Foundation for expert advice. Happy baking!
Cooking Tips and Notes for Christmas Lights Cookies
Common Pitfalls and How to Avoid Them
Baking Christmas Lights Cookies is as festive as it is fun, but a few common pitfalls can sneak up on you. Here’s how to keep your cookie-making experience merry and bright:
-
Overmixing the Dough: It’s tempting to mix until completely smooth, but this can result in tough cookies. Mix just until combined for the best texture.
-
Chilling the Dough: Don’t skip this step! Chilling your dough for at least an hour ensures that your cookies maintain their shape while baking. It also enhances the flavors.
-
Inconsistent Sizes: Uniform cookie sizes make for even baking. Consider using a cookie scoop for consistent portions—your Christmas Lights Cookies will look more professional that way!
-
Baking Times: Keep an eye on your cookies toward the end of the baking time. They’ll continue to cook on the baking sheet after being removed from the oven, so take them out when they’re just set.
By avoiding these common missteps, you’ll set yourself up for sweet success. For inspiration on cookie decoration, check out resources like The Spruce Eats for creative icing ideas!

Serving Suggestions for Christmas Lights Cookies
Creative Ways to Present Your Cookies
When it comes to Christmas lights cookies, presentation can elevate these festive treats from simple snacks to show-stoppers at your holiday gatherings. Here are a few creative ideas to delight your guests:
-
Beautiful Cookie Platters: Arrange your cookies on a decorative platter along with some colorful holiday candies or dried fruits. This adds a vibrant touch and makes the cookies even more appealing.
-
Mason Jar Gifts: Layer the cookies in mason jars for a thoughtful gift. Add a ribbon tied around the jar for a personal touch. It’s a charming way to share your festive cheer with friends or coworkers.
-
Holiday-Themed Stands: Use themed cupcake stands or tiered trays to display your cookies at parties. This elevates their visibility and creates an inviting dessert table.
Did you know that the visual appeal of food can significantly enhance the dining experience? According to research from the Journal of Sensory Studies, how food is presented can influence taste perception. So let those Christmas lights cookies shine bright and spread the holiday joy! For more festive baking ideas, consider checking out sources like The Kitchn or Bakerella.
Ultimately, however you choose to serve your cookies, make sure to enjoy the festive spirit they bring to the season!
Time Breakdown for Christmas Lights Cookies
When tackling the delightful task of making Christmas Lights Cookies, it’s essential to plan your time wisely. Here’s a quick overview to help you get your cookie game on point.
Preparation time
Spend about 15-20 minutes gathering ingredients and mixing up that delicious dough. It’s a fantastic moment to crank up your favorite festive playlist!
Baking time
Once your dough is ready, you’ll need about 10-12 minutes for each batch in the oven. Keep an eye on them for that perfect golden-brown finish.
Decorating time
Now, the fun part! Decorating your Christmas Lights Cookies will take around 30 minutes, depending on your artistic flair. Grab those colorful sprinkles and icing to bring your cookies to life.
Total time
In total, you’re looking at about 1 hour and 10 minutes from start to finish. A small investment for delicious, festive fun! Interested in learning more about cookie baking techniques? Check out this source for some extra insights.
Nutritional Facts for Christmas Lights Cookies
Approximate calories per cookie
When you indulge in these delightful Christmas Lights Cookies, you can expect each cookie to contain approximately 120 calories. Isn’t it comforting to know you can enjoy a festive treat without going overboard? Just keep an eye on portion sizes, especially if you plan to share (or not!).
Breakdown of key nutrients
While it’s the flavor and holiday spirit that truly elevate these cookies, let’s break down some of the key nutrients:
- Fat: About 5 grams, primarily from butter, providing a rich, tender texture.
- Carbohydrates: Roughly 17 grams, giving you that satisfying sweetness.
- Protein: Around 1 gram, courtesy of the eggs.
- Sugar: Approximately 8 grams, balancing sweetness with the colorful icing.
Understanding these numbers can help you make mindful decisions during the festive season. If you’re interested in healthier alternatives, consider using whole grain flour or natural sweeteners. For more detailed nutritional insights, check out sources like the USDA National Nutrient Database.
Enjoying Christmas Lights Cookies can be part of your holiday fun without guilt, just remember to balance them with healthy snacks throughout the day!
FAQs about Christmas Lights Cookies
What is the best way to store Christmas Lights Cookies?
To keep your Christmas Lights Cookies fresh and tasty, store them in an airtight container at room temperature. This will help maintain their delightful flavor and chewy texture. If you’re planning on enjoying them later, you can freeze the cookies in a single layer, then transfer them to a freezer-safe container. Just remember to layer them with parchment paper to avoid sticking. They can last up to three months in the freezer!
Can I make the dough in advance?
Absolutely! Making the dough in advance is a smart way to save time during the busy holiday season. You can prepare the Christmas Lights Cookies dough and refrigerate it for up to three days. If you’re looking to prep even further, consider freezing the dough. Just shape it into discs, wrap tightly in plastic wrap, and store in your freezer. When you’re ready to bake, thaw the dough in the refrigerator overnight and bake as directed.
How can I customize my cookie toppings?
Customization is one of the best parts of making Christmas Lights Cookies! Start with a base of royal icing to create your colorful lights, then let your creativity shine. Here are some ideas for toppings:
- Sprinkles: Choose colorful holiday-themed sprinkles to add a festive touch.
- Candy: Use mini chocolate chips or M&Ms for added sweetness.
- Edible Glitter: For a shimmering effect, sprinkle on some edible glitter after icing your cookies.
Each of these options adds a unique flair to your cookies while giving you the chance to showcase your personality. For more decoration tips and recipes, you can check out resources like The Cookie Countess for inspiration and ideas. Enjoy crafting your delightful treats!
Conclusion on Christmas Lights Cookies
Baking Christmas lights cookies brings a spark of joy, not just for you, but also for everyone who gets to taste them. The vibrant colors and delightful shapes transform your kitchen into a wonderland of holiday cheer. Sharing these sweet treats with friends and family creates warm memories and a sense of community that encapsulates the spirit of the season.
These cookies are not just a dessert; they’re a wonderful way to express creativity and celebrate togetherness. Embrace this festive baking tradition, gather your loved ones, and let your imagination shine. Who can resist the charm of whimsical Christmas lights on a cookie? For more festive ideas, check out this holiday baking guide for inspiration!
PrintChristmas Lights Cookies: Easy Festive Treats for the Holidays

Celebrate the holiday season with these delightful Christmas Lights Cookies, perfect for festive gatherings.
- Prep Time: 20 minutes
- Cook Time: 12 minutes
- Total Time: 32 minutes
- Yield: 36 cookies
- Category: Dessert
- Method: Baking
- Cuisine: American
- Diet: Vegetarian
Ingredients
- 2 cups all-purpose flour
- 1 teaspoon baking soda
- 1 teaspoon baking powder
- 1/2 teaspoon salt
- 1 cup unsalted butter, softened
- 1 cup granulated sugar
- 1 cup brown sugar, packed
- 2 large eggs
- 2 teaspoons vanilla extract
- 1 teaspoon almond extract
- 2 cups chocolate chips
- 1 cup colorful sprinkles
Instructions
- Preheat your oven to 350°F (175°C).
- In a bowl, whisk together flour, baking soda, baking powder, and salt.
- In a separate bowl, cream together the butter, granulated sugar, and brown sugar until smooth.
- Add eggs, vanilla extract, and almond extract to the butter mixture and mix well.
- Gradually add the dry ingredients to the wet ingredients, mixing until just combined.
- Fold in chocolate chips and sprinkles.
- Drop rounded tablespoons of dough onto ungreased baking sheets, spacing them evenly.
- Bake for 10-12 minutes, or until edges are golden brown.
- Allow to cool on baking sheets for a few minutes before transferring to wire racks to cool completely.
Notes
- For extra decoration, use icing to create light strings on the cookies.
- These cookies can be made a day in advance and stored in an airtight container.
Nutrition
- Serving Size: 1 cookie
- Calories: 150
- Sugar: 10g
- Sodium: 100mg
- Fat: 8g
- Saturated Fat: 5g
- Unsaturated Fat: 2g
- Trans Fat: 0g
- Carbohydrates: 20g
- Fiber: 1g
- Protein: 2g
- Cholesterol: 30mg
")