
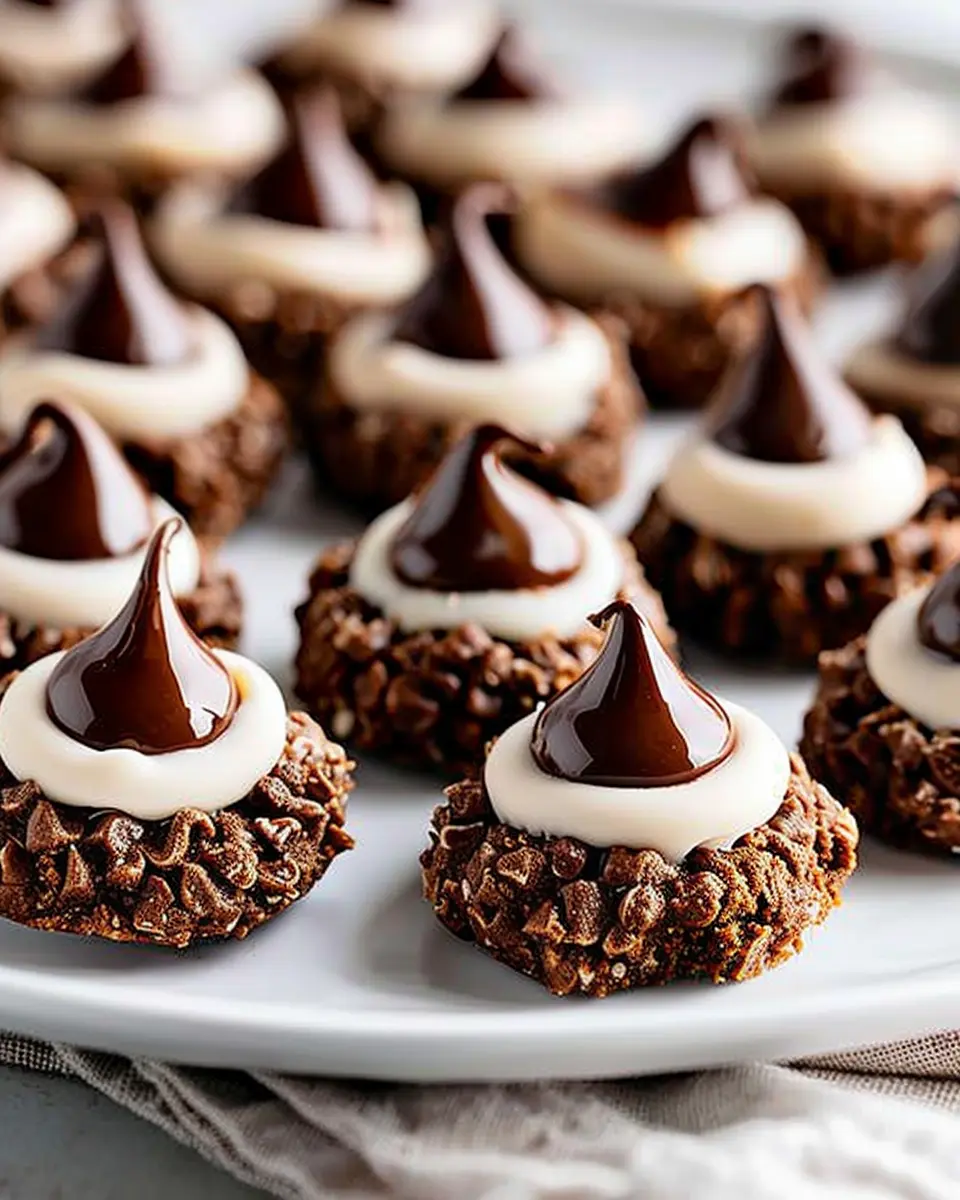
Introduction to Chocolate Thumbprint Cookies
There’s something undeniably enchanting about homemade cookies. Whether it’s the warm, inviting aroma wafting through your kitchen or the joyous look on a friend’s face when presented with a fresh batch, baking cookies is a delightful experience that transcends generations. Among the myriad of cookie recipes out there, chocolate thumbprint cookies hold a special place in many hearts. These treats are not only beautiful but also satisfy that sweet tooth craving in an exceptionally indulgent way.
The allure of homemade cookies
Making cookies at home can be incredibly rewarding. It’s not just about the end result; it’s also about the process. The act of mixing flour, sugar, and butter can be surprisingly therapeutic. Plus, according to a study from the American Journal of Public Health, engaging in creative activities is linked to improved mental health. So, why not whip up a batch of those delightful chocolate thumbprint cookies? When you’re done, you’ll not only have scrumptious treats to share but also a sense of accomplishment.
Filling those little thumbprint divots with rich chocolate ganache or jam adds an extra layer of charm and flavor. Just imagine presenting these cookies at a weekend gathering or bringing them into the office. You’re bound to become the go-to person for snack suggestions! Plus, they’re easy to customize—consider trying out different fillings like peanut butter or caramel to tickle your taste buds.
If you’re curious about improving your baking skills, check out reputable resources like King Arthur Baking or Serious Eats for their expert tips on achieving the perfect cookie texture. Remember, the best cookies come straight from your kitchen, filled with love and passion.
Whether you’re an experienced baker or a kitchen novice, chocolate thumbprint cookies are an excellent recipe to have in your repertoire. So, gather your ingredients, roll up your sleeves, and let’s dive into the world of chocolatey goodness!

Ingredients for Chocolate Thumbprint Cookies
Creating the perfect Chocolate Thumbprint Cookies is all about using the right ingredients. Here’s what you’ll need to whip up this delightful treat.
Essential Ingredients for the Cookies
To make mouthwatering thumbprint cookies, gather the following staples:
- All-purpose flour: The base for our cookies provides the right texture.
- Cocoa powder: For that rich chocolate flavor, opt for unsweetened.
- Granulated sugar: A touch of sweetness goes a long way.
- Butter: Use unsalted for better control over salt content.
- Eggs: One large egg binds everything together.
- Baking powder: This helps the cookies rise perfectly.
- Vanilla extract: For a warm and inviting flavor.
Filling Ingredients to Complement the Cookies
Now comes the fun part—choosing your filling! Here are some delightful options:
- Chocolate ganache: Rich and creamy, it’s a classic choice.
- Fruit jams: Raspberry or apricot jams add a sweet and tangy twist.
- Nut butters: Almond or peanut butter can be a nutty surprise.
With these ingredients, your Chocolate Thumbprint Cookies are sure to impress friends and family alike. Curious about subbing ingredients or enhancing your recipe? Check out BBC Good Food for tailored tips and tricks!
Step-by-step Preparation of Chocolate Thumbprint Cookies
Baking can be a rewarding and delightful experience, especially when you’re making something as charming as Chocolate Thumbprint Cookies. With a rich chocolate base and a dollop of your favorite filling, these cookies are perfect for satisfying your sweet tooth or impressing guests at your next gathering. So, let’s dive into a step-by-step guide that will make your baking process seamless and enjoyable!
Creaming the butter and sugar
The first step in our delightful journey to Chocolate Thumbprint Cookies begins with creaming the butter and sugar. Start by taking unsalted butter, about one cup, and letting it soften at room temperature. This extra time allows the butter to blend smoothly with sugar, resulting in a fluffy texture that’s essential for good cookies.
- In a mixing bowl, combine the softened butter and one cup of granulated sugar.
- Use an electric mixer or a wooden spoon to beat them together until the mixture is light in color and fluffy. This usually takes around 3-5 minutes.
- Why is this step critical? It’s all about incorporating air, which will give your cookies a tender crumb.
Adding in the remaining wet ingredients
Next, it’s time to introduce the wet ingredients to our batter! This includes adding in one large egg and a teaspoon of pure vanilla extract.
- Crack the egg into the butter-sugar mixture and add the vanilla.
- Mix continuously until everything is evenly combined.
The egg acts as a binding agent, helping your cookies hold their shape during baking, while the vanilla will amplify that lovely aroma. Have you ever noticed how a kitchen filled with the smell of vanilla makes you feel? It’s heavenly!
Combining dry ingredients for the cookie base
Now, let’s shift gears and talk dry ingredients. This step ensures that our cookie base has the right texture and structure.
- In a separate bowl, whisk together one and three-quarter cups of all-purpose flour, one-third cup of unsweetened cocoa powder, half a teaspoon of baking powder, and a pinch of salt.
- Gradually add the dry mixture to your creamed butter and sugar, mixing until just combined.
Be mindful not to over-mix; it can lead to tougher cookies. If you’re unsure about your mixing technique, the experts at King Arthur Baking recommend mixing until no flour bits are visible. This will give you the perfect dough for shaping into thumbprint cookies.
Chilling the dough for easier handling
After combining both wet and dry ingredients, it’s time to prepare your dough for shaping. Chilling is a crucial step, especially for cookie doughs.
- Wrap your dough in plastic wrap and refrigerate for at least 30 minutes.
Chilling the dough serves two purposes: it makes it easier to handle and helps prevent spreading during baking. Have you ever had cookies spread too much and become one giant mess? Trust me; a little chill time goes a long way!
Shaping and baking the cookies
Once your dough is nicely chilled, it’s time for the fun part—shaping!
- Preheat your oven to 350°F (175°C).
- Take out your chilled dough and scoop out about a tablespoon’s worth; roll it into a ball.
- Use your thumb (or the back of a small spoon) to create a small indentation in the center of each ball.
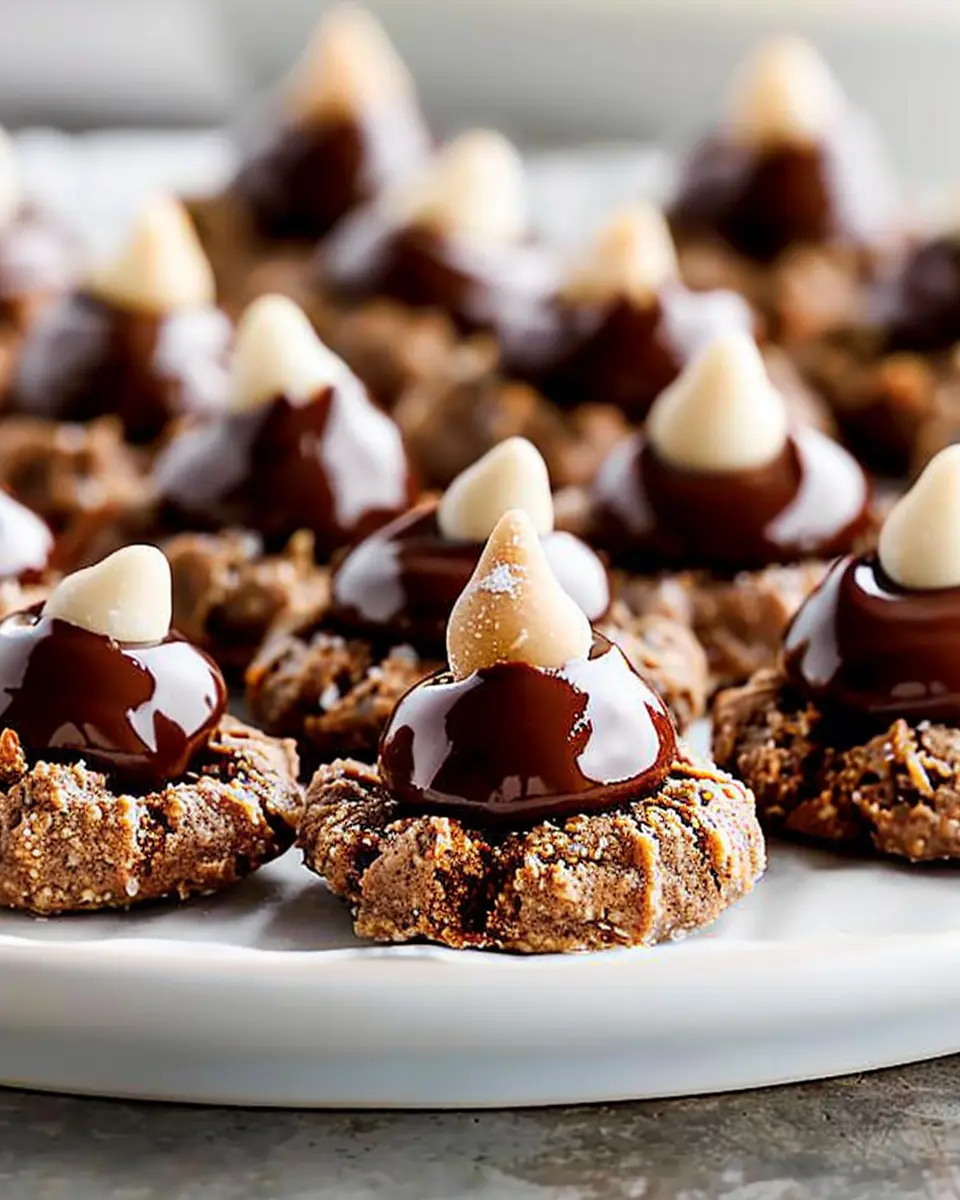
Now, here’s where the magic happens. You can fill that thumbprint with a variety of options—whether it’s a rich chocolate ganache, raspberry jam, or even a creamy peanut butter blend.
- Place the shaped cookies on a parchment-lined baking sheet, leaving some space between them.
- Bake in your preheated oven for around 12-15 minutes.
Don’t forget to monitor them closely! You’ll know they’re ready when the edges start to look firm but the centers are still slightly soft.
Wrapping up your baking adventure
Once out of the oven, let your Chocolate Thumbprint Cookies cool for a few minutes before transferring them to a wire rack. The aroma wafting through your home will surely create an atmosphere of joy and anticipation. These cookies are perfect for any occasion or a quiet evening at home with a cup of tea. Happy baking!

Variations on Chocolate Thumbprint Cookies
When it comes to chocolate thumbprint cookies, the classic version is delightful on its own, but the beauty of baking lies in creativity! Below are some fun variations to elevate your cookie game.
Nutty Chocolate Variations
You can easily introduce a nutty twist to your chocolate thumbprint cookies. Consider mixing various nuts into your dough. Here are a few suggestions:
- Almond Flour: Replace some regular flour with almond flour for a subtle nutty flavor.
- Chopped nuts: Stir in crushed walnuts, pecans, or hazelnuts for added texture.
- Nut Butter Filling: Instead of the traditional chocolate filling, use a spoonful of creamy peanut butter or almond butter. The combination of chocolate and nuts is simply irresistible!
For more nutty inspiration, check out this article on baking with nuts.
Seasonal Flavors to Try
Don’t hesitate to adapt your chocolate thumbprint cookies to the changing seasons! Seasonal flavors can spice things up:
- Peppermint: During the winter months, add a dash of peppermint extract to your cookie dough and fill the thumbprints with peppermint chocolate.
- Pumpkin Spice: In the fall, mix in pumpkin puree and pumpkin spice. It adds a cozy flavor that’s perfect for autumn gatherings.
- Citrus: In the summer, consider a lemon or orange zest infusion to brighten the chocolate. It offers a refreshing contrast that’s both fun and vibrant.
Personalize your chocolate thumbprint cookies to reflect the seasons, and don’t hesitate to share your creative combinations with friends! Happy baking!
Baking Tips and Notes for Chocolate Thumbprint Cookies
Common pitfalls to avoid
When baking Chocolate Thumbprint Cookies, there are a few common pitfalls to be aware of. One major mistake is skipping the measurements—precision is key for cookie success! Always use a kitchen scale for the best results.
Another issue arises when it comes to oven temperature. Each oven can vary, so it’s wise to invest in an oven thermometer. This simple tool can ensure you’re baking at the right heat. Undercooked cookies can be chewy in an unpleasant way; overcooked ones turn brittle. A perfectly baked cookie should be set on the edges but slightly soft in the center.
The role of chilling in cookie texture
Chilling your dough is crucial for achieving that perfect texture in your Chocolate Thumbprint Cookies. If you skip this step, your cookies may spread too much, losing that charming thumbprint shape. Chilling solidifies the fat in the dough, resulting in thicker, chewier cookies. Aim to chill the dough for at least 30 minutes. This will also enhance the flavor—yes, it’s worth the wait!
For more tips on achieving ideal cookie textures, check out resources from Baking.org and The Kitchn. Happy baking!
Serving Suggestions for Chocolate Thumbprint Cookies
Perfect pairings for serving
Chocolate Thumbprint Cookies are absolute delights on their own, but pairing them can elevate their charm. Consider serving them alongside a rich cup of freshly brewed coffee or a fragrant cup of tea, which balances out the sweetness. If you’re looking to impress, a scoop of vanilla or mint ice cream creates a delightful contrast. For a refreshing touch, pair with a homemade berry compote or fresh fruit like strawberries and raspberries to complement the chocolate.
Creative presentation ideas
How you present your Chocolate Thumbprint Cookies can really make a difference! Here are a couple of ideas to inspire your serving style:
-
Stacked Delight: Arrange cookies in a tall stack on a decorative plate to create a visually appealing centerpiece.
-
Cookie Jars: Present them in charming glass jars with a ribbon tied around for a cozy, homemade feel—perfect for gifting!
Whether enjoying them with friends or family, these serving suggestions will make your Chocolate Thumbprint Cookies the crowning glory of your dessert table. For more ideas on unique cookie presentations, check out The Spruce Eats.
Time Breakdown for Chocolate Thumbprint Cookies
When it comes to baking delightful Chocolate Thumbprint Cookies, understanding the time commitment is essential. Let’s break it down so you can plan accordingly.
Preparation Time
The first step in your baking journey is preparation. Expect to spend about 20-30 minutes gathering ingredients, mixing, and rolling the dough into neat little balls ready for filling.
Baking Time
Once prepped, these cookies will need to bake for 12-15 minutes. This is when the kitchen will fill with that irresistible chocolate aroma.
Total Time
All in, you’re looking at a total cooking experience of around 35-45 minutes from start to finish. This makes Chocolate Thumbprint Cookies a perfect option for a quick sweet treat! If you need more tips on timing, consider checking out this guide on effective meal prep from Bon Appétit. Happy baking!
Nutritional Facts for Chocolate Thumbprint Cookies
Calories per cookie
If you’re wondering about the caloric content of these delicious Chocolate Thumbprint Cookies, each cookie typically contains around 100 calories. That makes them a sweet treat that won’t derail your daily diet! Just be mindful of portion sizes — those cookies have a way of disappearing quickly.
Key nutrients to consider
When you indulge in Chocolate Thumbprint Cookies, it’s good to know what you’re getting nutrition-wise:
- Healthy Fats: Depending on your choice of nut butters, these cookies can provide essential fats.
- Vitamins and Minerals: Ingredients like cocoa powder are rich in antioxidants.
- Fiber: If you add oats or whole grain flour, you’ll get a fiber boost.
For more insights on the health benefits of chocolate, you can check the Healthline article. Enjoy these cookies in moderation; they can definitely be part of a balanced diet!
FAQs about Chocolate Thumbprint Cookies
When diving into the delightful world of Chocolate Thumbprint Cookies, it’s natural to have a few questions. Here are some common queries to help you create the perfect batch!
Can I substitute ingredients in the recipe?
Absolutely! Baking is often about creativity. For instance, if you’re looking to make your Chocolate Thumbprint Cookies gluten-free, simply swap regular flour for a gluten-free blend. Don’t have semisweet chocolate? Dark chocolate or a mixture of chocolate types can work wonders too. A handy resource for ingredient swaps is King Arthur Baking. Just remember that substitutions might slightly alter texture and flavor, so consider your options!
How can I store leftover cookies?
To keep your cookies fresh, store them in an airtight container at room temperature. They should stay delicious for about a week. For longer storage, you can freeze your Chocolate Thumbprint Cookies for up to three months. Just layer them between parchment paper to avoid sticking, and pop them in a freezer bag. When you’re ready to indulge, let them thaw on the counter.
What are some alternatives to chocolate kisses for the filling?
If you want to switch things up, there are plenty of fun fillings to explore! Consider:
- Nut butters: Almond or peanut butter adds a delightful twist.
- Caramel: A rich caramel filling can elevate the flavor experience.
- Fruit compote: For a fresh touch, try raspberry or strawberry preserves.
- Marshmallow fluff: If you’re looking for something sweet and gooey, this is a fantastically fun alternative!
Getting creative with fillings not only customizes your Chocolate Thumbprint Cookies but also makes baking feel like a personal adventure. Happy baking!
Conclusion on Chocolate Thumbprint Cookies
The joy of sharing homemade cookies
There’s something truly special about Chocolate Thumbprint Cookies. Not only are these delightful treats easy to make, but they also invite moments of togetherness. Imagine setting a plate of these delicious cookies on your table and watching as friends and family gather around, laughing and reminiscing. Each bite is a little piece of joy, a reminder that good food brings people closer.
Sharing your homemade cookies can brighten someone’s day and create lasting memories. So, whether it’s a family gathering or a casual get-together with friends, don’t forget to whip up a batch of these cookies. Trust me—everyone will thank you for it! For more delicious dessert ideas, check out resources like Serious Eats or Food Network.
PrintChocolate Thumbprint Cookies: The Best Indulgent Treat to Try

Indulge in the rich flavors of chocolate thumbprint cookies, a delightful treat perfect for any occasion.
- Prep Time: 15 minutes
- Cook Time: 12 minutes
- Total Time: 27 minutes
- Yield: 24 cookies
- Category: Desserts
- Method: Baking
- Cuisine: American
- Diet: Vegetarian
Ingredients
- 1 cup unsalted butter
- 1 cup granulated sugar
- 1 teaspoon vanilla extract
- 2 cups all-purpose flour
- 1/2 cup cocoa powder
- 1/4 teaspoon salt
- 1 cup chocolate chips
Instructions
- Preheat the oven to 350°F (175°C).
- Cream together the butter and sugar until smooth.
- Stir in the vanilla extract.
- Combine the flour, cocoa powder, and salt in a separate bowl, then gradually add to the butter mixture.
- Form the dough into balls and place them on a baking sheet.
- Use your thumb to make an indent in each ball, then fill with chocolate chips.
- Bake for 10-12 minutes, then allow to cool.
Notes
- For an extra touch, drizzle melted chocolate on top before serving.
- Ensure cookies are completely cool before storing.
Nutrition
- Serving Size: 1 cookie
- Calories: 120
- Sugar: 10g
- Sodium: 50mg
- Fat: 8g
- Saturated Fat: 5g
- Unsaturated Fat: 3g
- Trans Fat: 0g
- Carbohydrates: 15g
- Fiber: 1g
- Protein: 2g
- Cholesterol: 30mg


")