
Introduction to Easy Hershey’s Red Velvet Blossoms Cookies
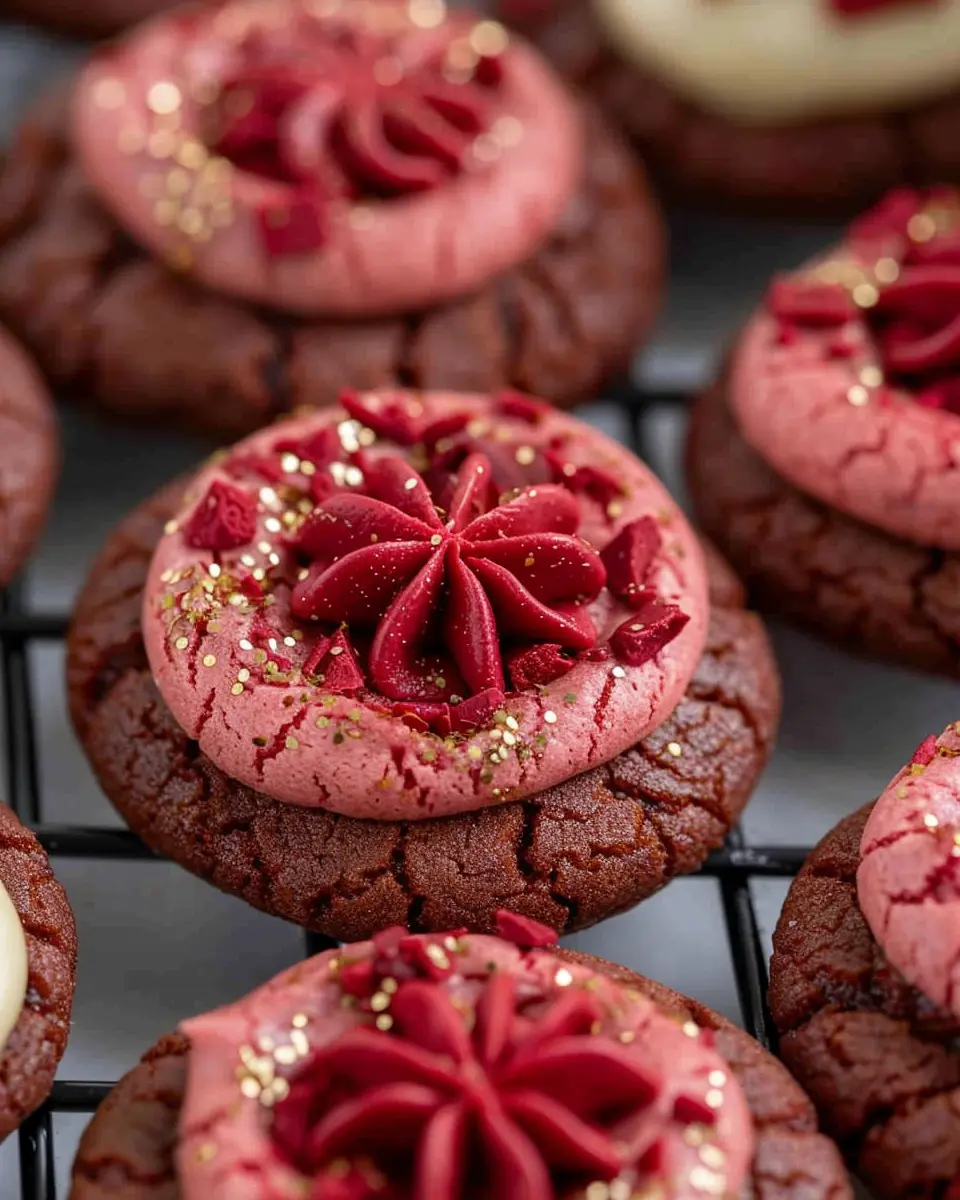
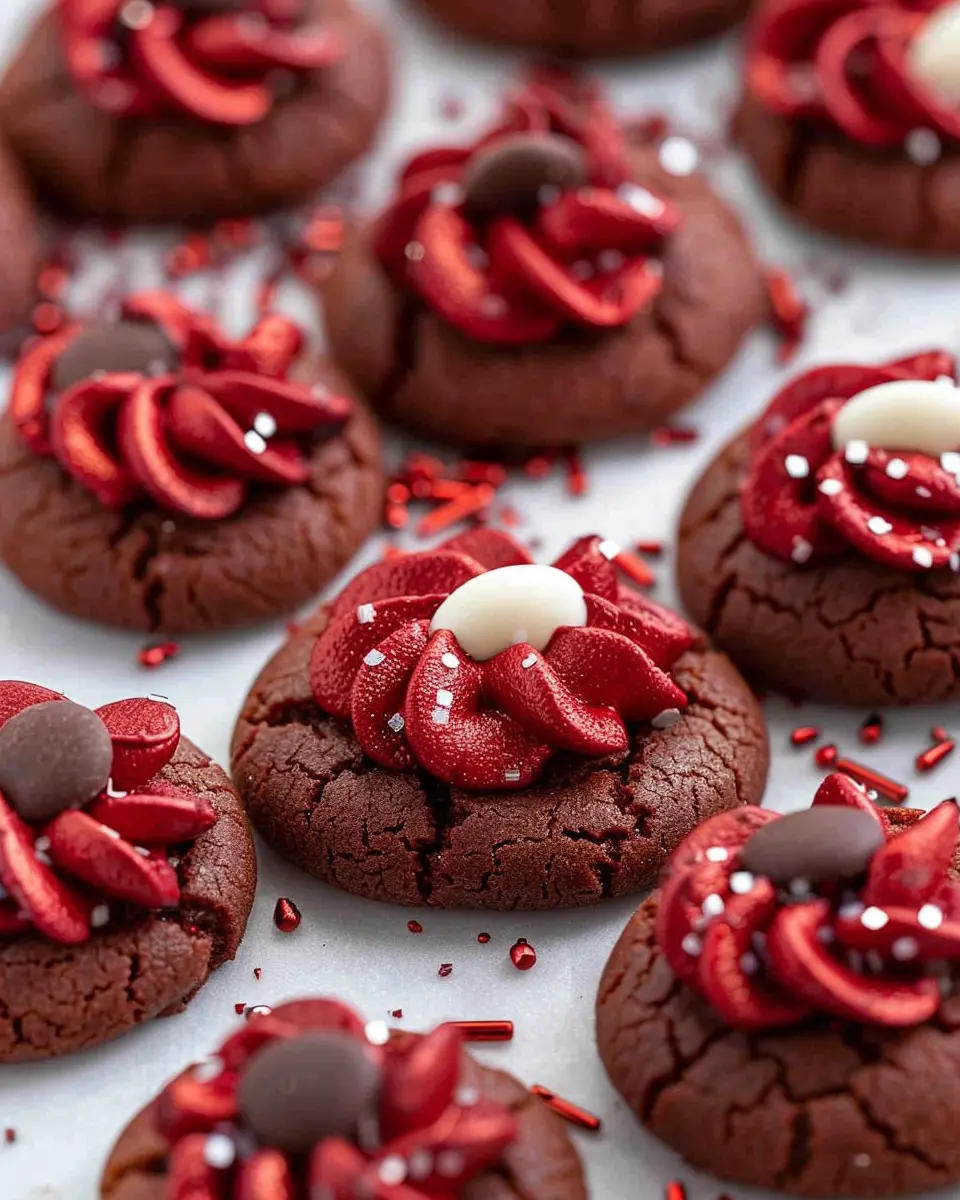
What are Red Velvet Blossoms Cookies?
If you’re looking for a fun and festive treat that captures the spirit of a classic dessert, look no further than Red Velvet Blossoms Cookies! These delightful cookies combine the rich, velvety texture of traditional red velvet cake with the comforting sweetness of a chocolate candy center, often a Hershey’s Kiss. Their striking red color makes them a perfect choice for special occasions or just to brighten up a regular day.
These cookies are not only visually appealing but also incredibly simple to make. With ingredients you likely already have in your pantry, whipping up a batch of easy Hershey’s red velvet blossoms cookies can become your new go-to recipe for last-minute gatherings or cozy nights in. Plus, they are an excellent opportunity to unleash your creativity! While the standard recipe is delicious, feel free to swap in different types of kisses or drizzles to make them your own.
Why are these cookies perfect for young professionals?
Let’s face it, life as a young professional can be fast-paced and demanding. You juggle deadlines, meetings, and a social life, often leaving little room for elaborate baking projects. That’s where easy Hershey’s red velvet blossoms cookies come in!
-
Quick and Simple: This recipe is designed to be straightforward, with minimal prep and baking time. In as little as 30 minutes, you could have a batch of warm cookies ready to enjoy or share with coworkers.
-
Make Ahead and Store: These cookies store well, so you can whip up a double batch over the weekend and savor them throughout the week. Just keep them in an airtight container, and they’ll be fresh for days!
-
Guilt-Free Indulgence: Even if you’re watching your sugar or calorie intake, treating yourself once in a while is important. These cookies allow you to indulge without the feeling of guilt, especially when shared among friends or family.
So, why not give these easy Hershey’s red velvet blossoms cookies a try this week? They’re a great way to bring joy to your busy schedule, and who doesn’t love the aroma of freshly baked cookies wafting through their home? For tips on the best baking practices, check out resources from King Arthur Baking.
Let’s get baking!

Ingredients for Easy Hershey’s Red Velvet Blossoms Cookies
Baking doesn’t have to be complicated, and with these easy Hershey’s Red Velvet Blossoms Cookies, you can impress friends and satisfy your sweet tooth without breaking a sweat. Here’s what you’ll need to whip up a batch of these delightful cookies.
Essential ingredients you’ll need
- Red velvet cake mix: The star ingredient that gives these cookies their vibrant color.
- Vegetable oil: For that perfect chewy texture.
- Eggs: Two large eggs will bind everything together beautifully.
- Granulated sugar: A touch of sweetness that balances the rich flavors.
- Hershey’s Kisses: These will sit atop each cookie, adding a delicious chocolatey finish.
Where to find specialty items
You might be wondering where to find certain ingredients, especially the red velvet cake mix and Hershey’s Kisses. Most grocery stores carry these in the baking aisle or seasonal sections. If you can’t find them locally, consider checking online retailers like Amazon or specialty baking stores. You can also explore local bakeries for unique flavors and ingredients.
Getting these essentials together is the first step to creating your delicious cookies. Happy baking!
Preparing Easy Hershey’s Red Velvet Blossoms Cookies
Baking can feel like an art form, especially when you’re crafting something as delightful as Hershey’s Red Velvet Blossoms Cookies. As a seasoned baker in the kitchen, I’ve learned that the key to a successful baking session is prep work. So, roll up those sleeves, and let’s get started!
Preheat the Oven
First things first, let’s get that oven warmed up! Preheating is important because it ensures that your cookies bake evenly, giving you that delightful soft center and slightly crisp exterior we all love. Turn your oven to 350°F (175°C). While it’s heating, you can tackle the other steps without losing any precious time!
Cream the Butter and Sugars
Next up, grab a large mixing bowl and add:
- ½ cup of softened butter
- 1 cup of granulated sugar
- ½ cup of brown sugar
Using an electric mixer or a good old-fashioned whisk, cream these ingredients together until the mixture is light and fluffy. This process incorporates air, leading to a perfectly tender cookie. If you want to dive deeper into the science of creaming, you can check out resources from Serious Eats on optimal mixing techniques.
Incorporate the Wet Ingredients
Once your butter and sugars are looking fabulous, it’s time to add the wet ingredients:
- 1 large egg
- 1 tablespoon of vanilla extract
- 1 tablespoon of food coloring (preferably red)
Blend these in until combined, keeping that fluffy texture. The food coloring element is what brings the iconic red velvet color to your cookies, making them visually appealing as much as they are delectable.
Mix the Dry Ingredients
In a separate bowl, whisk together the dry ingredients:
- 1 ½ cups of all-purpose flour
- 1 teaspoon of baking soda
- 1 teaspoon of cocoa powder
- ½ teaspoon of salt
Gradually add the dry ingredients to the wet mixture. Be careful not to overmix; a few flour streaks left are okay. Overmixing can lead to tough cookies, and nobody wants that!
Shape the Cookies
Now, the fun part: shaping those delightful cookies! Using your hands or a cookie scoop, form the dough into roughly 1-inch balls. This ensures they bake evenly. Place them on a baking sheet lined with parchment paper, giving them enough space to spread as they bake. Trust me, you’ll want them to have room to grow into their full delicious potential.
Bake to Perfection
Slide those beauties into the preheated oven and set your timer for 10-12 minutes. The key is to watch for their edges to turn a light golden brown. They might not seem fully set in the middle, but don’t worry; they will continue to cook as they cool on the baking sheet.
Add the Hershey’s Kiss
As soon as you take your cookies out of the oven, it’s all about that finishing touch! Gently press a Hershey’s Kiss into the center of each cookie while they’re still warm. This lets the chocolate melt slightly, creating that perfect gooey goodness when you take a bite.
Let your easy Hershey’s red velvet blossoms cookies cool on the baking sheet for a few minutes before transferring them to a wire rack. And there you have it! Your cookies are now ready to wow your friends and satisfy those sweet cravings.
Crafting these Hershey’s Red Velvet Blossoms Cookies not only fills your kitchen with the most inviting aroma but also creates a delightful treat for any occasion. Happy baking!
Variations on Easy Hershey’s Red Velvet Blossoms Cookies
Gluten-free Red Velvet Blossoms
For those following a gluten-free lifestyle, adapting the Easy Hershey’s Red Velvet Blossoms Cookies recipe is a breeze! Simply swap out the all-purpose flour for a gluten-free blend. Make sure to choose a blend that contains xanthan gum to maintain the right texture. If you’re feeling adventurous, try almond flour or oat flour for a unique twist. Just remember that these flours may alter the cookie’s flavor slightly, so consider adding a pinch of vanilla extract or even almond extract to enhance the taste.
Seasonal Variations and Add-ins
Why stop at classic red velvet? This versatile cookie recipe can easily evolve to fit the season or your cravings. Here are some fun ideas to try:
- Spring: Incorporate pastel-colored M&Ms or seasonal sprinkles for a festive touch.
- Summer: Add in some fresh berries or a hint of lemon zest for a refreshing flavor profile.
- Fall: Mix in chopped pecans and a sprinkle of pumpkin spice for that cozy autumn vibe.
- Winter: Fold in mini white chocolate chips and top with crushed peppermint candy canes for a delicious holiday treat.
Feeling creative? Consider drizzling some chocolate or cream cheese frosting on top for an extra layer of decadence.
Looking to explore more cookie variations? Check out this guide on cookie creativity, which offers tips and tricks to elevate your baking game.
So go ahead and enjoy experimenting with your Easy Hershey’s Red Velvet Blossoms Cookies! With these variations, you’ll never get bored of the same old recipe.
Baking Notes for Easy Hershey’s Red Velvet Blossoms Cookies
Tips for a Perfect Cookie Texture
Achieving the ideal texture for your easy Hershey’s red velvet blossoms cookies is all about the balance between soft and chewy. Here are some tips you won’t want to overlook:
- Chill the dough: After mixing your ingredients, let the dough chill for at least 30 minutes. This helps prevent spreading during baking, giving you that thick, lovable cookie.
- Measure accurately: Use the spoon-and-level method for flour to avoid overly dense cookies. Too much flour can lead to dryness, while too little can result in flat cookies.
- Don’t overlook your oven: Always preheat your oven properly. An accurate temperature ensures even baking—make sure to use an oven thermometer for best results.
Common Mistakes to Avoid
Even seasoned bakers can have hiccups, so here are some mistakes to sidestep:
- Skipping the baking soda: This key ingredient helps your cookies rise, providing that fluffy interior the easy Hershey’s red velvet blossoms cookies are known for.
- Overbaking: Remember, cookies continue to bake on the sheet even after you pull them out of the oven. Aim for a slightly underbaked cookie for that soft texture; they should look set but still soft in the middle.
By keeping these tips and common pitfalls in mind, you’re well on your way to making delicious, picture-perfect Hershey’s Red Velvet Blossoms Cookies. Need more baking tips? Check out Baker’s Journal for insights from pros!

Serving Suggestions for Easy Hershey’s Red Velvet Blossoms Cookies
Perfect Pairings with Beverages
When it comes to enjoying your easy Hershey’s red velvet blossoms cookies, the right beverage can elevate your treat to a whole new level. Consider pairing these delightful cookies with a rich glass of milk or even a sweetened herbal tea like chamomile or hibiscus. The creaminess of the milk enhances the chocolatey flavor of the Hershey’s kiss on top, making each bite even more satisfying.
You might also explore the delicious world of coffee! A robust espresso or a light latte can beautifully complement the cookie’s sweetness. If you’re looking for something more refreshing, try serving your cookies with a homemade vanilla iced coffee or a sparkling fruit punch.
Creative Presentation Ideas
Presentation is key when sharing your easy Hershey’s red velvet blossoms cookies. For a cozy vibe, arrange them on a rustic wooden board or in a stylish glass jar. Add a few decorative touches, such as fresh mint leaves or edible flowers.
If you’re gifting these cookies, consider wrapping them in colorful tissue paper tied with twine—simple, yet charming. For a festive touch, display them on a tiered stand during celebrations or casual get-togethers. Each option adds a unique flair to your cookie serving style.
Explore more ideas on styling baked goods with tips from Food Network.
While indulging in these easy Hershey’s red velvet blossoms cookies, take a moment to savor how the flavors harmonize with your beverage and appreciate the presentation. It’s all about enjoyment!
Time details for Easy Hershey’s Red Velvet Blossoms Cookies
Preparation time
Making these easy Hershey’s Red Velvet Blossoms Cookies is a breeze! You’ll need about 15 minutes to gather your ingredients and whip up the dough. It’s a perfect opportunity to put on your favorite playlist or catch up on a podcast while getting ready to bake.
Baking time
Once your dough is ready, pop those beautiful cookie dough balls in the oven. They’ll need about 10 to 12 minutes to bake. Keep an eye on them towards the end; you want a lovely soft finish without overbaking.
Total time
In total, you’re looking at approximately 30 minutes from start to finish. Whether you’re hosting a gathering or just satisfying a sweet craving, these cookies come together quickly and effortlessly. If you’re interested in more speedy recipes, check out this guide to 30-minute meals for inspiration!
Nutritional Information for Easy Hershey’s Red Velvet Blossoms Cookies
Calories per cookie
When you’re indulging in easy Hershey’s Red Velvet Blossoms Cookies, it’s helpful to know what you’re savoring! Each cookie contains approximately 100 calories. This makes it a delightful treat that won’t completely derail your daily dietary goals, especially if enjoyed in moderation.
Key Nutritional Highlights
These cookies offer a few noteworthy nutritional components:
-
Fats: With about 4.5 grams of fat per cookie, they strike a balance that helps keep you satisfied without being overly indulgent. Opting for reduced-fat options can further decrease this number.
-
Sugar: Each cookie has around 8 grams of sugar. While it adds to that sweet flavor, be mindful of daily sugar intake; the American Heart Association recommends no more than 25 grams for women and 36 grams for men.
-
Carbohydrates: With about 13 grams, they provide a quick energy boost, making them great for an afternoon pick-me-up.
While these numbers can differ based on the specific ingredients you use, such as substituting with whole wheat flour or using dark chocolate kisses, they give a solid overview of your tasty treat. For a deeper dive into healthy eating, you might find this resource on nutrition labels helpful.
Enjoy your baking, and remember, it’s all about balance!
FAQs about Easy Hershey’s Red Velvet Blossoms Cookies
Can I substitute ingredients?
Absolutely! Easy Hershey’s Red Velvet Blossoms Cookies are quite flexible with substitutions. If you’re out of buttermilk, you can make a homemade version with milk and vinegar or lemon juice. For a gluten-free option, replace regular flour with a gluten-free blend. Additionally, consider using a plant-based butter if you want a vegan twist. Just keep in mind that the texture might slightly change based on these swaps. For more tips on ingredient substitutions, check out this helpful article from The Kitchn.
How should I store leftover cookies?
To maintain the delightful softness of your easy Hershey’s Red Velvet Blossoms Cookies, store them in an airtight container at room temperature. If you’re looking to extend their life, refrigerating them can help, but be sure to let them come back to room temperature before indulging for that fresh-baked feel.
How long do these cookies stay fresh?
When stored properly, these cookies can last about a week. The initial freshness is best enjoyed within the first few days, however. If you want to keep a stash for later, consider freezing them. They can stay delicious for up to three months when wrapped tightly! For best results on thawing, allow them to sit at room temperature for a bit or pop them in the microwave for a quick warm-up.
These tips should get you well on your way to baking success with your easy Hershey’s Red Velvet Blossoms Cookies! Happy baking!
Conclusion on Easy Hershey’s Red Velvet Blossoms Cookies
Why you should try making these cookies today!
If you’re looking for a delightful twist on a classic treat, why not whip up some easy Hershey’s red velvet blossoms cookies today? These cookies not only stand out with their stunning crimson hue, but they also offer a rich, chocolatey flavor that’s simply irresistible. Plus, they’re easy to make, even for beginners!
Imagine surprising your friends or family with a batch of these beautiful cookies at your next gathering. They’re perfect for any occasion, from casual get-togethers to festive celebrations. And honestly, who doesn’t love a little chocolate goodness? By giving these cookies a try, you’ll be bringing joy and deliciousness to your kitchen. It’s time to sparkle with some red velvet magic!
PrintEasy Hershey’s Red Velvet Blossoms Cookies: Your New Favorite Treat

These Easy Hershey’s Red Velvet Blossoms Cookies are a delightful twist on the classic cookie, featuring a vibrant red color and a delicious chocolate kiss on top.
- Prep Time: 20 minutes
- Cook Time: 12 minutes
- Total Time: 32 minutes
- Yield: 30 cookies
- Category: Dessert
- Method: Baking
- Cuisine: American
- Diet: Vegetarian
Ingredients
- 2 1/2 cups all-purpose flour
- 1 teaspoon baking soda
- 1 teaspoon salt
- 1/4 cup unsweetened cocoa powder
- 1 cup granulated sugar
- 1/2 cup unsalted butter, softened
- 1 large egg
- 1 tablespoon red food coloring
- 1 teaspoon vanilla extract
- 30 Hershey’s Kisses, unwrapped
Instructions
- Preheat your oven to 350°F (175°C).
- In a bowl, mix flour, baking soda, salt, and cocoa powder.
- In a separate bowl, cream together the sugar and softened butter.
- Add the egg, red food coloring, and vanilla extract to the butter mixture and blend well.
- Gradually add the dry ingredients to the wet ingredients, mixing until combined.
- Shape the dough into 1-inch balls and place them on a baking sheet.
- Bake for 10-12 minutes, then press a Hershey’s Kiss into the center of each cookie as soon as they come out of the oven.
- Allow to cool before serving.
Notes
- For a fun twist, try adding white chocolate chips to the dough.
- Make sure to let the cookies cool completely before adding the Hershey’s Kisses to avoid melting.
Nutrition
- Serving Size: 1 cookie
- Calories: 150
- Sugar: 10g
- Sodium: 90mg
- Fat: 6g
- Saturated Fat: 4g
- Unsaturated Fat: 1g
- Trans Fat: 0g
- Carbohydrates: 20g
- Fiber: 1g
- Protein: 2g
- Cholesterol: 20mg


")